As I mentioned last month, in my post about a new pin I had made, I created a new photography set-up. I am finally getting around to telling you guys about it today.
I am a member of the handemadeology team on etsy, which is a business and promotion oriented team open to all. There is a great blog set up by the founders of the team that you can visit at http://handmadeology.com that is a wonderful resource for and support for etsy sellers. They have advertising tips and photography tips, and they also promote sellers, which is always appreciated!
I decided to build a cheap little light box based on the instructions provided by handmadeology here. I didn't want to buy foam board as the tutorial recommends because, as we all know by now, I am CHEAP. Rather, I currently have several large rolls of lovely artist paper that I bought on sale from a local art supply store, and I figured I could use that instead to line the cardboard box. So, I cut off two sides of a small cardboard box, and measured the bottom and sides of the box against the large roll of lightly-textured white paper.
Handmadeology has other great tips on improving photography, too:
I am a member of the handemadeology team on etsy, which is a business and promotion oriented team open to all. There is a great blog set up by the founders of the team that you can visit at http://handmadeology.com that is a wonderful resource for and support for etsy sellers. They have advertising tips and photography tips, and they also promote sellers, which is always appreciated!
I decided to build a cheap little light box based on the instructions provided by handmadeology here. I didn't want to buy foam board as the tutorial recommends because, as we all know by now, I am CHEAP. Rather, I currently have several large rolls of lovely artist paper that I bought on sale from a local art supply store, and I figured I could use that instead to line the cardboard box. So, I cut off two sides of a small cardboard box, and measured the bottom and sides of the box against the large roll of lightly-textured white paper.
 |
Ta-dahhhh! This is my wee little lightbox. I didn't do it perfectly, obviously, since there is a little area the paper doesn't cover in the corner. I need to do something about that. |
 |
I also covered one of the sides I cut off with aluminum foil to make a little light-reflecting tool. |
 |
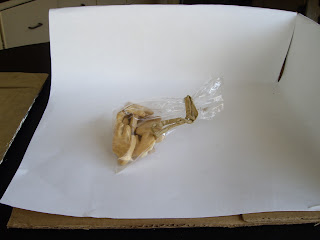
I know this is a weird picture of an odd little bag of home-made animal crackers, but I think it shows that the light-box distributes light really evenly around this small object. |
 |
This shows the way in which the little light-reflecting sheet helps to lighten up the front of the crackers. |
 |
This shows the crackers inside, away from direct light, and without the light-reflecting tool. It's subtle, but it seems to me that the shadows are more uneven and darker. |
 |
| An example of an unedited picture of my stripy collage pin taken in my little light box. |
 |
| An unedited picture of a new brooch (not yet on etsy!) and prop in direct light. |
 |
My newest pin! I love the way the bright colors look against the white. This is edited to pump up the colors a bit and to bring up the exposure. The evening light was soft and muted and is coming in from the left. I have the pin on a book in front of the lightbox in order to provide some more texture and shadows, but I like the way that the book and lightbox give it a simple, monotone background. |
- This article is about adding shine and brightness
- Another way to bring shine and a simple background
- A different kind of lightbox with artificial light

3 comments:
Wonderful!!! I need one of these ;D
Nice work on the box, the photos look great! :) I adore Handmadeology, would love to have several spare days to peruse all of their tips! ;)
Awesome- I just bookmarked your post for future reference!
Beautiful pins, by the way. :) They're fabulous!
Post a Comment